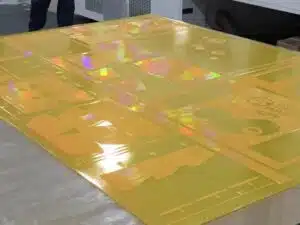
Maintaining plate consistency
With hectic production schedules and limited resources, monitoring and maintaining plate consistency may seem like an overwhelming task. Catherine Green, Global Product Support Manager walks you through the simple steps.
Discover the key tips to ensure you’re making consistent plates without disrupting valuable production time. Following these simple steps will optimize time and supplies in the plate room, and promote increased uptime on press, while ensuring long-life print performance.
Back Exposure – The Foundation
Back Exposure Facts:
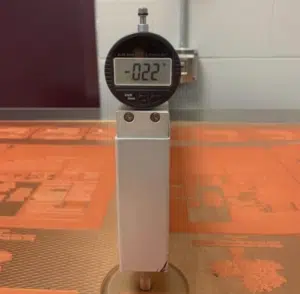
- Properly setting and maintaining the floor height is one of the most important components of producing consistent plates.
- The back exposure directly impacts the plate’s ability to form features during the main exposure, as well as the overall printability and durability of the plate.
- Unless there is a system issue or a material lot change, changes should be gradual and small adjustments can be made over time to correct gradual deviations away from the specficiation.
- Taking frequent measurements minimizes downtime and ensures ongoing plate consistency.
Table 1: Back Exposure Target Specifications for FLEXCEL NXH Plates:
| Plate Thickness | Floor Height | Relief Target |
|---|---|---|
| 1.14mm (0.045 in.) | 0.56 +/- 0.025 mm (0.022 +/-0.001 in.) |
0.58 +/- 0.025 mm (0.023 +/-0.001 in.) |
| 1.70 mm (0.067 in.) | 1.12 +/- 0.025 mm (0.044 +/-0.001 in.) |
0.58 +/- 0.025 mm (0.023 +/-0.001 in.) |
| 2.54 mm (0.10 in.) | 1.85 +/- 0.025 mm (0.073 +/-0.001 in.) |
0.69 +/- 0.025 mm (0.027 +/-0.001 in.) |
| 2.72 mm (0.107 in.) | 2.03 +/- 0.025 mm (0.080 +/-0.001 in.) |
0.69 +/- 0.025 mm (0.027 +/-0.001 in.) |
| 2.84 mm (0.112 in.) | 2.15 +/- 0.025 mm (0.085 +/-0.001 in.) |
0.69 +/- 0.025 mm (0.027 +/-0.001 in.) |
Monitoring Imaging in Production:
- Be sure to warm up the exposure lamps to 40C (104F) before starting any back exposure. This is critical for achieving floor consistency.
- Take measurements in several areas around the plate, staying away from images and outer edges.
- Every finished plate should be measured using a bench micrometer to determine if the floor thickness is within specification.
Imaging – Capture Every Detail
Imaging Facts:
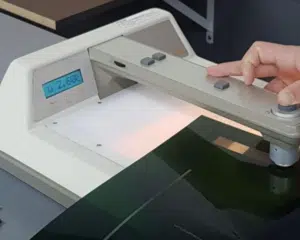
- The imager’s performance has a direct impact on highlight dots and DIGICAP NX patterning formation.
- We recommend you check the imaging performance once a week using the XRite 361T densitometer.
- There are two checkpoints on our QC target that give insight into your imager’s performance:
- Dmin: This is a 100% imaged area, measured to indicate overall ‘cleanout’ of the ablative layer on the TIL/TIL-R.
- 1×15: This is an isolated feature target that indicates the imager’s focus and speed settings.
Monitoring Imaging in Production:
Table 2: Imaging QC Specifications for TIL and TIL-R
| Test Patch | Thermal Imaging Layer
non DCNX* | DCNX |
Thermal Imaging Layer-R
non DCNX | DCNX |
|---|---|---|
| Dmin | 0.10 max | 0.63 max | 0.19 +/-0.03 | 0.81 max |
| 1×15 | 2.60 +/-0.03 | 2.60 +/-0.03 | 2.73 +/-0.03 | 2.73 +/-0.03 |
| 1x15wide | 2.62 +/-0.03 | 2.60 +/-0.03 | 2.73 +/-0.03 | 2.73 +/-0.03 |
Xrite 361T densitometer must be calibrated for accurate measurement. If imaging is not conforming to the specifications listed above, contact Miraclon service.

Main Exposure – Feature Formation
Main Exposure Facts:
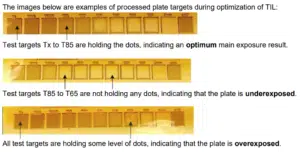
- Checking the main exposure is essential to ensuring consistency from plate to plate.
- We recommend you place the provided QC target on each plate sheet in production, checking for variations or plating errors before plates reach the pressroom.
- The QC target can be placed in a waste or trim area, at least 2 inches from the outer edges of the photopolymer sheet.
Monitoring Main Exposure in Production:
Checking the main exposure is a quick, visual process that is easy to carry out during plate production. Simply inspect the target according to these guidelines:
- Review and record the test targets results, concentrating on the image quality response within the TX, T-85 or T-95-R, and T65 test patches.

| All Plate Calipers | Thermal Imaging Layer | Thermal Imaging Layer-R |
|---|---|---|
| PASS | Test Target TX – T85 should hold 99.9% of the dots. | Test Target TX – T95-R should hold 99.9% of the dots. |
| FAIL | T65 should not hold most dots. | T65 should not hold most dots. |
Processing – Create the Relief
Processing Facts:
- Removing any uncured polymer from the plate surface is critical for making consistent plates.
- Photopolymer residue can yield inconsistent floor readings.
- Photopolymer residue remaining on the print surface or within the DIGICAP NX patterning can cause unexpected results on press.
Monitoring Processing in Production:
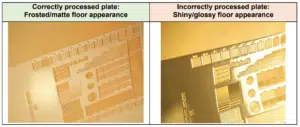
Checking the processing speed is as simple as inspecting the floor of a processed plate, so it’s easy to check frequently during production.
- A properly processed plate should have a floor with a “frosted” or matte appearance, while achieving the target relief.
- This appearance means that the processor has washed away any unexposed photopolymer, and only cured floor remains.
- If the plate has a shiny or glossy floor appearance, more processing time is needed.
Drying – The Key to Dimensional Stability
Drying Facts:
- Flexographic plates absorb solvent during the washout process, which increases the caliper of the overall plate.
- The drying process evaporates the excess washout solution and returns the plate to its original caliper.
- Maintaining uniform temperatures across the entire plate, along with optimized drying times, supports a longer-running, more stable plate on press with superior results.
Monitoring Drying in Production:
- To ensure drying time is optimized, check the overall caliper of a processed plate:
- Once every 20 minutes, until the original overall caliper of the plate is reached within 0.025 mm (0.001 in.).
- The time it takes to reach this caliper is the optimum drying time.
- Be mindful that changes in the processing conditions can affect the required drying time.
- Over drying the plate can lead to plate curl.
- Checking the overall caliper in production (along with checking the relief) should be done on every plate processed.
A properly dried plate is flat and measures within 0.025mm (0.001 in) of its original caliper.
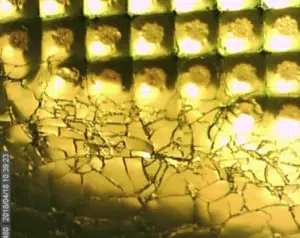
Post Exposure and UVC Light Finishing – Strength and Surface (SKV 66700)
Post Exposure and Light Finishing Facts:
- The post exposure and light finishing processes gives the plate its final cure, increasing the overall durability and resilience of the plate.
- After drying is complete, the plate surface is tacky and must be properly post exposed (UVA light) and light finished (UVC light) to be handled, printed, and stored.
- These final steps give the photopolymer important surface characteristics that allow for proper ink transfer and durability on press.
Monitoring Post Exposure (UVA) in Production:
- Minimal post exposure time is needed to provide the final cure for KODAK FLEXCEL NXH plates.
- Post exposure (UVA) can be verified by:
- Verifying the functionality of the UVA post exposure lamps using a UVA light meter (never visually inspect lamps).
- Verifying the plate is getting 2-3 minutes of exposure to UVA light.
Monitoring Light Finishing (UVC) in Production:
- Verifying the proper amount of light finishing (UVC) time is critical for optimal ink release and print perforamnce.
- To check that the light finishing (UVC) time is sufficient:
- Place a cover sheet onto the printing surface of the finished plate and press to ensure good contact.
- The cover sheet should peel away without sticking to the surface once enough light finishing time has been applied.
- If the sheet sticks, add more UVC light finishing time in 2-minute increments and re-test.
Plate cracking due to overexposure during UVC light finishing.
Inspecting these key checkpoints frequently and consistently will ensure that the platemaking process does not become a source of unwanted variance in the printing process.
We are here to help, so don’t hesitate to reach out to your Miraclon representative if you need assistance with KODAK FLEXCEL NX plates or equipment.
For futher instructions on any of these processes outlined in this article:
| Topic | SKV ID |
|---|---|
| Back Exposure | 62382 |
| Imaging | 70743 |
| Main Exposure | 70743 |
| Processing | 62382 |
| Drying | 64886 |
| Post Exposure and Light Finishing | 66700 |
Catherine says:
 With hectic production schedules and limited resources, monitoring and maintaining plate consistency may seem like an overwhelming task.
Discover the key tips to ensure you’re making consistent plates without disrupting valuable production time. Following these simple steps will optimize time and supplies in the plate room, and promote increased uptime on press, while ensuring long-life print performance.