Improve Print Performance with a Single-Color Test
A single-color benchmark test is an effective way to find print improvements and optimize press time. It’s just a question of getting the planning, execution and evaluation right, says Print Specialist Mike Huey in his new Tech Tip.
Selecting the correct pattern is pertinent to optimization and print improvement
When our team at Miraclon engages a new prospective customer or existing customer looking for improvement, we would normally start that process by utilizing a single-color benchmark test. “Improvement” in printing is a vague word, but Merriam-Webster defines it as “enhanced value or excellence”. So, using this definition of improvement, I have listed several areas where a customer or prospect would engage the idea of a single-color benchmark test:
- The printer is looking to improve uptime. Perhaps they are targeting press speed improvements, looking to decrease downtime related to plate cleaning, or reduce substrate waste.
- Improvements to graphic reproduction. A customer is actively selling higher send graphic capabilities and wants to push the bar on higher resolution.
- The addition of a new ink system, i.e., surface, reverse, heat resistance, LED, WB solvent or various coatings, etc.
- The customer is getting a new press.
- The customer is interested in a new anilox supplier or a new style of engraving. For exmaple, an open cell structure versus a closed cell structure anilox.
- A banded roll test to optimize ink laydown.
- A new tape is being evaluated to improve process, combo, or line print – to optimize ink transfer and laydown.
- A new film or paper is being introduced into the mix, and the customer would like to see what anilox and pattern will give them the best surface coverage.
These are just a few examples. This is not an all-encompassing list from which to evaluate improvements. There are four key areas to consider when determining that a single-color benchmark will take place:
Trial Goals
This discussion takes place with the printer and any other pertinent co-supplier, looking together at the specifics of the improvements to be targeted. The idea is to share and openly discuss the customer’s goals and intentions. The most important question to ask is; what does success look like? Although measurables are key to any improvement, in some cases, a single-color benchmark may not provide those measurables. The discussion about whether to move to a second phase of testing if the benchmark test is favorable, should still take place. However, in some cases a single-color benchmark may be the only test. One example might be if the customer wants to verify that a new ink will meet CPC color requirements.
Plan the trial
The is key to any trial – have a clear plan to meet the trial goals. What variables will we try? What layout will be used, and more importantly, will that layout have the required data points to evaluate whether we can make an improvement? Who will be present, and should other technical people and co-suppliers have their team ready and available to assist? When will the trial take place? What is the planned downtime for this trial to take place? Discuss options to the plan i.e., “if the medium durometer tape doesn’t perform to our expectations, we will try a softer alternative.” Or “if the 100 lpi / 2.4 BCM anilox is too strong we will put in over 1200 lpi / 1.9 BCM anilox”. These are just a few examples of Plan “B” if Plan “A” doesn’t achieve the trial goals. This is an important discussion to ensure success and most importantly, to make sure we are on track, so that “planned downtime” doesn’t turn into “unplanned downtime”.
Execute the trial
At this point we have established the goals, developed a plan, and now we just need to execute our plan. To successfully execute any plan, the pilot needs to understand the mission. If the operator hasn’t been included in the plan, this is a good time to review the whole scenario with the press operator. It’s especially pertinent that the operator understands the goals of the trial and even more importantly, the elements that are on the test plate, why they are important, and how they differentiate themselves. We also need to make sure the operator has the full press setup “recipe” available prior to setup. This includes information on print station, anilox, viscosity, press speed, substrate, and any other available setup information the company would normally provide their operators to run any regular print job. Being able to document the run conditions prior to the first pull is always a benefit and allows the team to make any adjustments necessary before putting ink on the plate. However, nothing should be outside of normal settings that typically run from day to day. You might be trailing a new tape, ink or anilox and minor changes might be necessary, but there shouldn’t be any substantial differences in the set-up from the normal day to day work. Most importantly, keep an open mind and make only single adjustments to verify that any adjustments make a positive impact toward the trial goals. And lastly, ensure that impression is even; this can simply be done by measuring an comparing print control bars on the operator and drive side of press.
Evaluate the trial
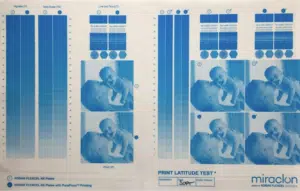
Congratulations: you have taken on a scenario where you have a problem or an improvement observation, planned and executed a successful trial, and now it is time to evaluate what, if any change or changes will reward the team’s efforts. Evaluating the trial results can range from simple to rather complex. How trial results are evaluated depends on the trail goals and how aspects will be inspected, either visually, microscopically and/or measured. Dot gain, L*a*b values, density, visual appearance, cleanliness of print, consistency and fineness of dot are some of the many possible considerations. Most importantly, how does evaluation align with the original goals you determined for your trial outcome and the concept of what does success look like? An example would be improving ink laydown and holding better reverses, such as the image below.

Whatever the trial goals you established, the results need to be fully vetted to verify improvement. In many cases, like the example above, the one-color benchmark test will be the only needed step. In more complex scenarios, such as trying to improve press speed, better proof to press color match, or any other live job scenarios, this then becomes just the first step to identifying the correct DIGICAP NX Patterning to be used for live jobs or fingerprint under the printer’s set run conditions.
In summary, be sure to specify clear trial goals, plan, execute and have a plan for how to evaluate results. In our example, the one-color benchmark test is the quickest, easiest test for a printer to complete, whether it’s for testing a new anilox, ink, tape or investigating operational improvements. It can be mounted and dropped into any deck at the end of a job that fits the printer’s schedule. Often, it’s recommended that printers always leave one of these plates mounted and ready. If you are encountering laydown issues, low density, pinholes or TEV etc., it’s easy to slide this single plate in to verify you are utilizing the correct pattern in conjunction with the anilox/ink already in the press. Once you have improved a process, you must keep the tools you need to troubleshoot conditions so you can print as intended. As flexographers, we understand the ability to control and predict ink film thickness is beneficial for OEE and quality print. Controlling ink film and ink spread are paramount to successful print operations – so the next time you are looking to make an operational change or improvement, discuss the use of a one-color benchmark with your Miraclon representative.
Mike says:
 There are many reasons to make use of a single-color benchmark trial, from selecting the best plate pattern for a job, looking for uptime improvements to evaluating a new anilox tape.
Setting goals, planning how to test the goals, setting-up the execution correctly and excellent evaluation are all needed to use benchmarks for print improvement.